Screenshots might seem like a simple irrelevant task, but they’re extremely valuable in everyday office life, especially when you’re collaborating with teams and colleagues. If you’re unfamiliar with the term, a screenshot is a digital snapshot of your computer screen (full screen or just a part of it), capturing exactly what you see at a particular moment. Whether it’s for troubleshooting IT issues, sharing visuals, or creating training materials, screenshots are extremely useful.
In this blog, we’re focusing on how to take screenshots using the Snipping Tool, a built-in feature in Microsoft Windows. We’ll walk you through a step-by-step guide, ensuring you can quickly and easily capture the parts of your screen you need.
What is Snipping Tool?
Firstly, let’s talk about the Windows Snipping Tool. This handy utility is a built-in Microsoft Windows feature introduced in Windows Vista and available in all later versions. It’s designed to make capturing screenshots simple, whether you need to grab your entire screen or just a specific section.
With the Snipping Tool, you can save your screenshots as image files like PNG or JPEG, making them straightforward to share or store. You can also email your captures directly from the tool, which is a time-saver when collaborating with others.
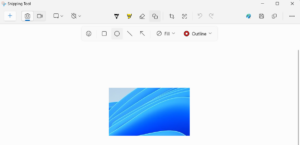
But that’s not all, the Snipping Tool includes basic editing features like a pen for annotations, an eraser for corrections, and even the option to add emojis for a touch of creativity.
How to Take a Screenshot Using Snipping Tool
Taking a screenshot using the Snipping Tool is quick and easy. Here’s a step-by-step guide to help you master this tool and make the most of its features.
- Open Snipping Tool
- Click New to Start a New Snip
- Capture Your Snip
- Save or Copy Your Screenshot
Open Snipping Tool

To get started, you’ll need to open the Snipping Tool. Here’s how:
- Select the Start button, type “snipping tool,” and choose it from the search results.
Alternatively, you can use one of these keyboard shortcuts:
- Press Windows logo key + Shift + S: Opens the tool for a static image snip.
- Press Print Screen (PrtSc): Captures the screen as a static snip.
- Windows logo key + Shift + R: Opens the tool for a video snip.
Click New to Start a New Snip

- Once the Snipping Tool is open, click New to begin a new screenshot.
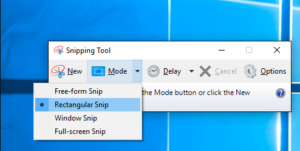
In earlier versions of Windows, you can select the arrow next to the Mode button to choose the snip type. You can choose from the rectangular snip, free-from, Windows or full-screen snip. After selecting the snip type, your screen will slightly dim, indicating that it’s ready for you to capture an area.

Capture Your Snip

Now it’s time to capture your snip.
- Use your cursor to drag and adjust the selection box to cover the exact area you want to capture. This gives you precise control over what appears in your screenshot.
Save or Copy Your Screenshot

Once you’ve captured your screenshot, you can choose what to do with it:
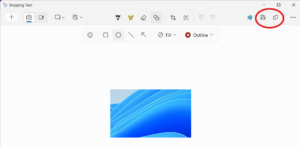
- Save it: Click the Save As button. In the dialogue box, enter a file name, select a location, choose the file type (e.g., PNG or JPEG), and hit Save.
- Copy and paste: For maximum efficiency, copy the screenshot directly into a document, chat, or email.
- You can also crop the image using the Image Crop button for further adjustments.
By following these steps, you’ll have a perfectly captured and easily shareable screenshot in no time!
Video Tutorial on How to Take a Screenshot Using Snipping Tool
If you prefer learning visually, we’ve got you covered! Sometimes, watching a quick demonstration can make all the difference in understanding how to use a tool effectively.
Below is a helpful video tutorial that walks you through the process of taking screenshots using the Snipping Tool step by step. It covers everything from opening the tool to saving your screenshots.
Take a moment to check it out, and you’ll be snapping and sharing screenshots like a pro in no time!
How Can Screenshots Make Your Life Easier?
Screenshots are more than just quick snapshots of your screen, they’re great tools that can improve productivity and collaboration in your charity in a variety of ways. Here are some practical examples of how screenshots can make your day-to-day tasks easier:
- Providing Visual Instructions or Guides
Screenshots are ideal for creating tutorials, much like the one in this blog. For example, a charity writing a blog to educate staff or supporters on specific topics can use screenshots to add clarity and make instructions more accessible.
- Troubleshooting Technical and IT Issues
When technical problems arise, screenshots can bridge the gap between users and IT support, helping your charity staff explain to the IT department the issue they’re experiencing. Capturing error messages, bugs, or specific issues allows your IT department to diagnose and resolve problems sooner.
- Sharing Content or Designs for Feedback
Screenshots are a quick and efficient way to share visuals during collaborative projects. Instead of saving and sending files, a simple screenshot can stage designs, documents, or plans for immediate feedback. This method streamlines communication and improves collaboration. Check out our tips for nonprofit online collaboration best practices to learn more.
By incorporating screenshots into your workflow, you’ll find it easier to share ideas, solve problems, and communicate successfully with your team.
Closing Thoughts
The Snipping Tool is a simple yet great feature that can considerably enhance your charity’s collaboration and productivity. From creating visual guides to resolving IT issues and streamlining team feedback, screenshots are an instrumental resource for any organisation.
Get in Touch
Want to take your charity’s collaboration to the next level with Microsoft 365?
Book your FREE consultation with our IT experts at Qlic today and discover how we can support your mission!


