
Data security for charities and proper data management have never been more important. Whether you’re handling sensitive donor information or managing financial records, ensuring that your data is protected is a critical part of daily operations. Excel documents often contain important data, making them a common target for data breaches or accidental loss. Protecting your Excel documents also ensures data integrity and prevents accidental modifications. That’s why implementing password protection is a simple yet effective way to safeguard your data.
Unprotected Excel files can expose your charity to various risks, including unauthorised access, data breaches, and compliance issues. By password-protecting documents, you can ensure that only authorised personnel have access, enhancing your organisation’s data security. Did you know that you can also protect your Word files? Follow our nonprofit guide to password protect your Word documents to learn how.
In this blog, we’ll guide you through the process of password-protecting Excel files to increase your charity’s data security, as well as discuss key benefits and tips for protecting sensitive information.
How to Password Protect an Excel Document: Step-by-Step Instructions
In this section, we will walk you through the process of adding password protection to your Excel documents. Before we begin, it’s important to note that Microsoft cannot retrieve forgotten passwords, so choose a strong password that is memorable yet secure.
By following the steps below, you’ll ensure your Excel files are locked and accessible only to those with the proper credentials.
Step-by-Step Instructions:
- Open the Info menu by clicking File
- Look for the Protect Workbook option
- Click “Encrypt with Password” from the dropdown choices
- Type your chosen password when prompted
- Type the same password again to confirm it
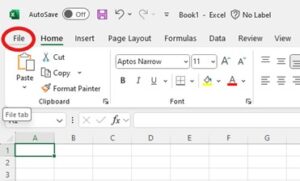
Open the Info menu by clicking File
First, open your Excel workbook, and navigate to the “File” tab located in the top left corner of the screen. This will open the Info menu, where you can access security and sharing options.

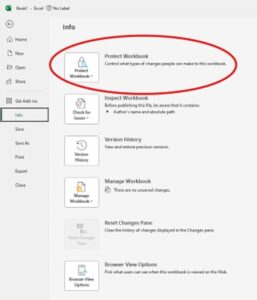
Look for the Protect Workbook option
In the Info section, find and click on the “Protect Workbook” option. From here, you can decide whether to protect the entire workbook or specific worksheets. For instance, selecting “Structure” will prevent users from altering formulas or formatting in protected sheets.
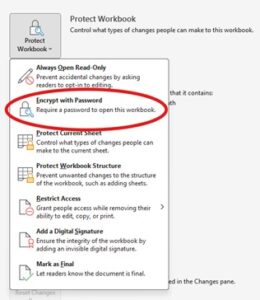
Click “Encrypt with Password” from the dropdown choices
After selecting “Protect Workbook,” a dropdown menu will appear. Click on “Encrypt with Password,” which will prompt a pop-up box where you can set your password.
Type your chosen password when prompted
Once the “Encrypt with Password” option is selected, you will be prompted to type your chosen password. Ensure it is both strong and memorable.
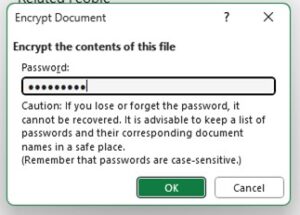
Type the same password again to confirm it
To confirm your password, Excel will ask you to type it again. This ensures there are no typing mistakes in the first attempt. After you confirm, your Excel file will now be password-protected.


Understanding The Different Types of Excel Protection
When it comes to securing your Excel documents, it’s fundamental to understand the different types of protection available. Depending on who is accessing or working on the document, you can choose the most appropriate method to ensure your data remains protected. Excel offers multiple layers of protection to fit various needs:
- File-level
- Workbook-level
- Worksheet-level protection
By understanding the different types of protection and following the step-by-step instructions, you’ll be well-equipped to secure your Excel documents on any platform, whether you’re using a Windows PC or a Mac.
Here’s a breakdown of each:
File-Level Protection
File-level protection allows you to lock down the entire Excel file by requiring a password to either open or modify it. Users without the password can access the file in “Read Only” mode, preventing any modifications. This type of protection is particularly useful when you want to restrict full access to vulnerable information.
Workbook-Level Protection
Workbook-level protection is the most thorough way to secure your Excel file. It locks the structure of the workbook so users cannot add, delete, or move worksheets within the file. This is especially useful when multiple people are working within the same workbook, and you want to prevent any unwanted changes to its overall structure. More information on workbook-level protection can be found here.
Worksheet-Level Protection
If you only need to secure specific sheets within your workbook. This method allows you to restrict edits to certain parts of the worksheet while leaving others open for modifications. To protect a worksheet follow these steps:
- Select the worksheet you want to protect.
- Right-click on the sheet tab at the bottom.
- Choose ‘Protect Sheet.’
- Select which elements users can modify (e.g., formatting, inserting rows).
- Enter a password (optional but recommended).
- Click ‘OK.’
How to Password Protect an Excel Document on a Mac
For Mac users, password protecting an Excel document is also straightforward, though the steps differ slightly from Windows. Here’s how to secure your Excel files on macOS:
- Open the document in Microsoft Excel
- Click on the Tools menu in the top menu bar and select File > Passwords
- In the Password to open field, type a password
- Click OK
- Confirm your password
- Click OK again
- Save your workbook to apply changes
Step-by-Step Instructions:
Open the document in Microsoft Excel
Open the file you want to protect using Excel on your Mac.
Click on the Tools menu in the top menu bar and select File > Passwords
Navigate to the top menu bar and click on “Tools,” then select “File > Passwords.”
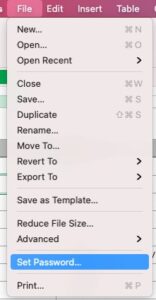
In the Password to open field, type a password
Enter your desired password in the “Password to open” field. After entering your password, click OK to proceed.
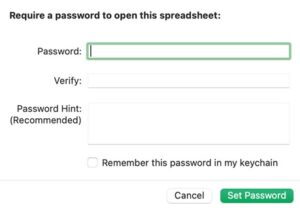
Confirm your password
You will be asked to confirm the password by typing it again.
Click OK again
Confirm your password protection by clicking OK once more.
Save your workbook to apply changes
Save your workbook to ensure password protection is applied.
Closing Thoughts
When multiple people collaborate on a project and have access to shared documents, protecting working files like Excel documents is an effective way to prevent data loss and ensure the security and privacy of sensitive information.
Whether you’re handling financial data or donor information, password protecting your files not only keeps them secure but also helps you stay compliant with data protection regulations. By ensuring that your teams know how to password protect an Excel document, you will improve collaboration within your charity and people will be able to work smoothly without compromising data integrity. For more tips on improving collaboration, check out our guide on top collaboration tools for nonprofits.
Get in Touch
Would you like to learn more about staying secure and protecting your data when working with Microsoft 365?
Book your FREE consultation with our IT experts at Qlic today by clicking the button below.


