At not-for-profit organisations, efficiency and organisation are key to maximising overall impact in the community. One often overlooked but simple and effective way to streamline daily tasks is by using desktop shortcuts. These handy shortcuts can significantly cut down the time spent navigating files and applications, allowing charity staff on their day-to-day mission tasks.
This blog post is designed to quickly guide you through desktop shortcuts on Windows 11. We explain why these shortcuts are important for maintaining a well-organised digital workspace and provide a step-by-step guide on how to create them. We’ve also included a helpful YouTube tutorial to ensure you have all the support you need. Let’s dive in and simplify your daily digital tasks with Windows 11 shortcuts.
Why Add a Shortcut to Your Windows 11 Desktop
Adding shortcuts to your Windows 11 desktop offers an abundance of benefits, especially for nonprofit staff and volunteers who often have multiple tasks and programs to use. Desktop shortcuts save valuable time by allowing immediate access to essential applications and files, eliminating the need to navigate through various folders or menus. This offers improved accessibility, whether managing donor databases, coordinating events, or communicating with team members.
For example, having a shortcut to any of the Microsoft 365 suite applications can be a game-changer. With just one click, you can open tools like Outlook for email communication, Word for document creation, or Teams for collaboration. For more on how Microsoft 365 can benefit your charity, you can explore our ultimate guide to Microsoft 365 for charities and nonprofits.
Additionally, shortcuts can link directly to specific folders on your organisation’s OneDrive, allowing quick access to documents in the cloud. This ensures that staff and volunteers can easily gather and share files and faciltate smoother operations. Learn more about the benefits of OneDrive for your charity. Lastly, desktop shortcuts for collaboration tools can enhance teamwork and project management. Having immediate access to tools like Slack or Asana can streamline communication and task delegation, making it easier to stay on top of projects.
Video Tutorial for How to Create a Shortcut on Windows 11 Desktop
Here is our video tutorial on desktop shortcuts, which walks you through the process of creating a desktop shortcut on Windows 11. This step-by-step video covers everything from locating your desired file to placing its shortcut on your desktop. Whether you’re new to using Windows 11 or need a quick refresher, this tutorial is designed to make the process straightforward and easy to follow.
Step-by-Step Guide to Creating a Desktop Shortcut in Windows 11
Creating desktop shortcuts can significantly enhance your productivity by providing quick access to your most-used applications and files. Follow these detailed steps to create a desktop shortcut on Windows 11, complete with screenshots to guide you through the process.
- Right Click on Your Windows 11 Desktop
- Scroll down to “New” and select “Shortcut”.
- Click “Browse” and select the application.
- Click “OK”, then “Next”.
- Name your Desktop Shortcut
- Click “Finish” to Create the Desktop Shortcut
Step 1: Right Click on Your Windows 11 Desktop
Start by right-clicking on your Windows 11 desktop. This will then open a context menu with various options.
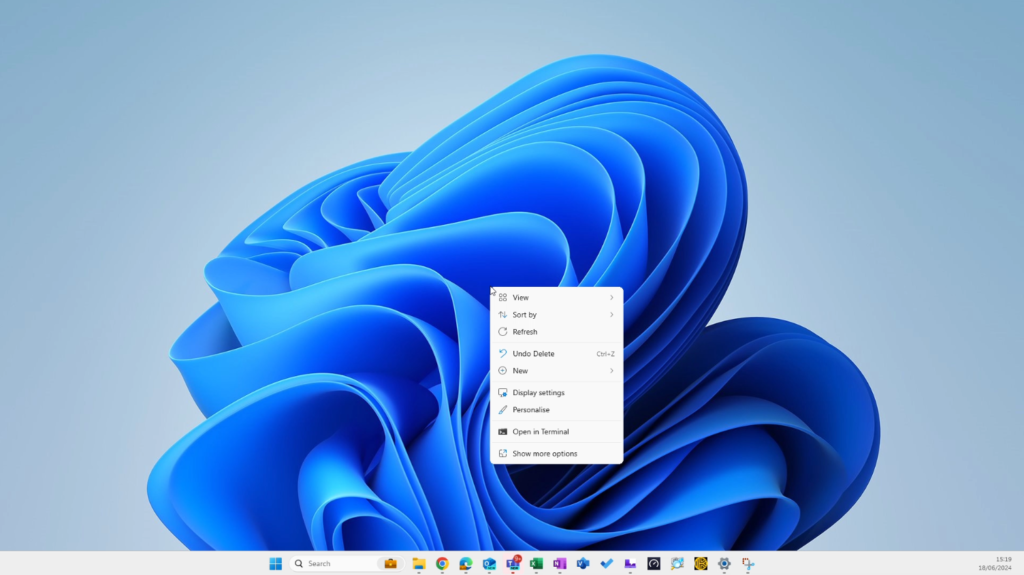
Step 2: Scroll Down to “New” and Select “Shortcut”
From the right-click menu, select “New” and then “Shortcut”. This will initiate the shortcut creation process.

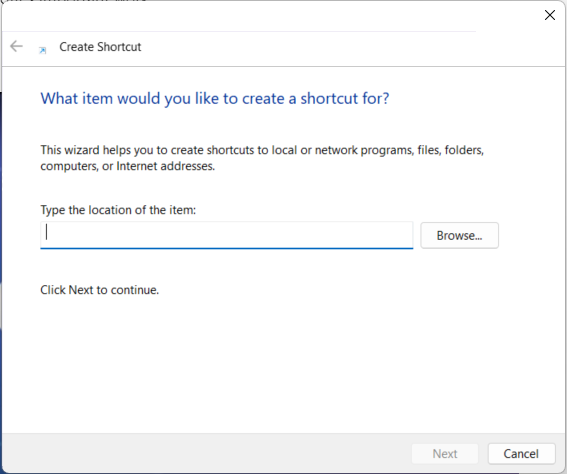
Step 3: Click “Browse” and Select the Application
Click on “Browse” to open the file explorer and then the application you want to create a shortcut for. For example, if you want to create a shortcut for SharePoint, find and select the SharePoint application from the Browse function.
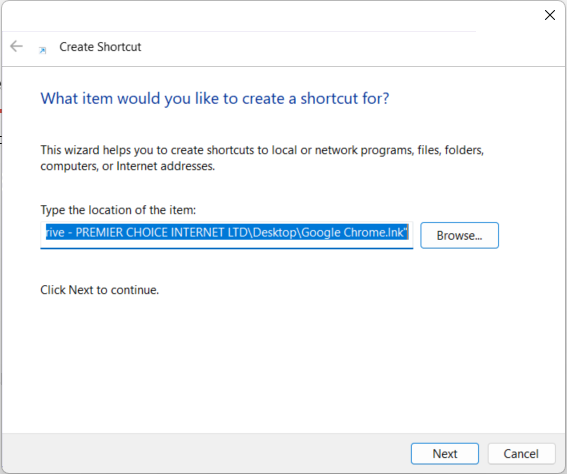
Step 4: Click “OK”, then “Next”
After selecting your chosen application, click “OK”, then “Next” to proceed to the next step where you will name your shortcut.
Step 5: Name Your Desktop Shortcut
Enter the desired name for your shortcut. This name will appear below the shortcut icon on your desktop.
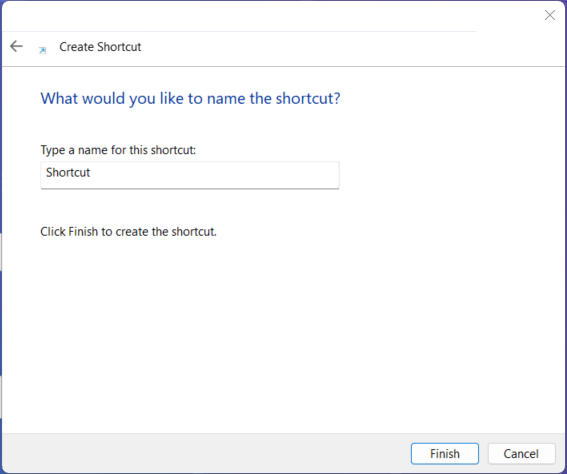
Step 6: Click “Finish” to Create the Desktop Shortcut
Click “Finish” to create the shortcut. You should now see the shortcut icon appear on your desktop.
Final Thoughts on Creating Desktop Shortcuts
Incorporating desktop shortcuts into your workflow can greatly enhance your productivity and organisation within your nonprofit. By providing quick and easy access to your applications and files, shortcuts can save valuable time and reduce the frustration of navigating through multiple items.
We encourage nonprofits to leverage these simple yet powerful Microsoft IT solutions to streamline operations and improve efficiency. Microsoft offers numerous discounts and grants to help organisations access the latest technology at a reduced cost. If your organisation isn’t already taking advantage of these opportunities, be sure to look into the options available for Windows 11 and other Microsoft applications by exploring Microsoft licenses available free for charities and nonprofits.
GET IN TOUCH
Would your charity like to learn more about improving its IT solutions and efficiencies? Click the button below to book your FREE Consultation with our IT experts at Qlic IT.